
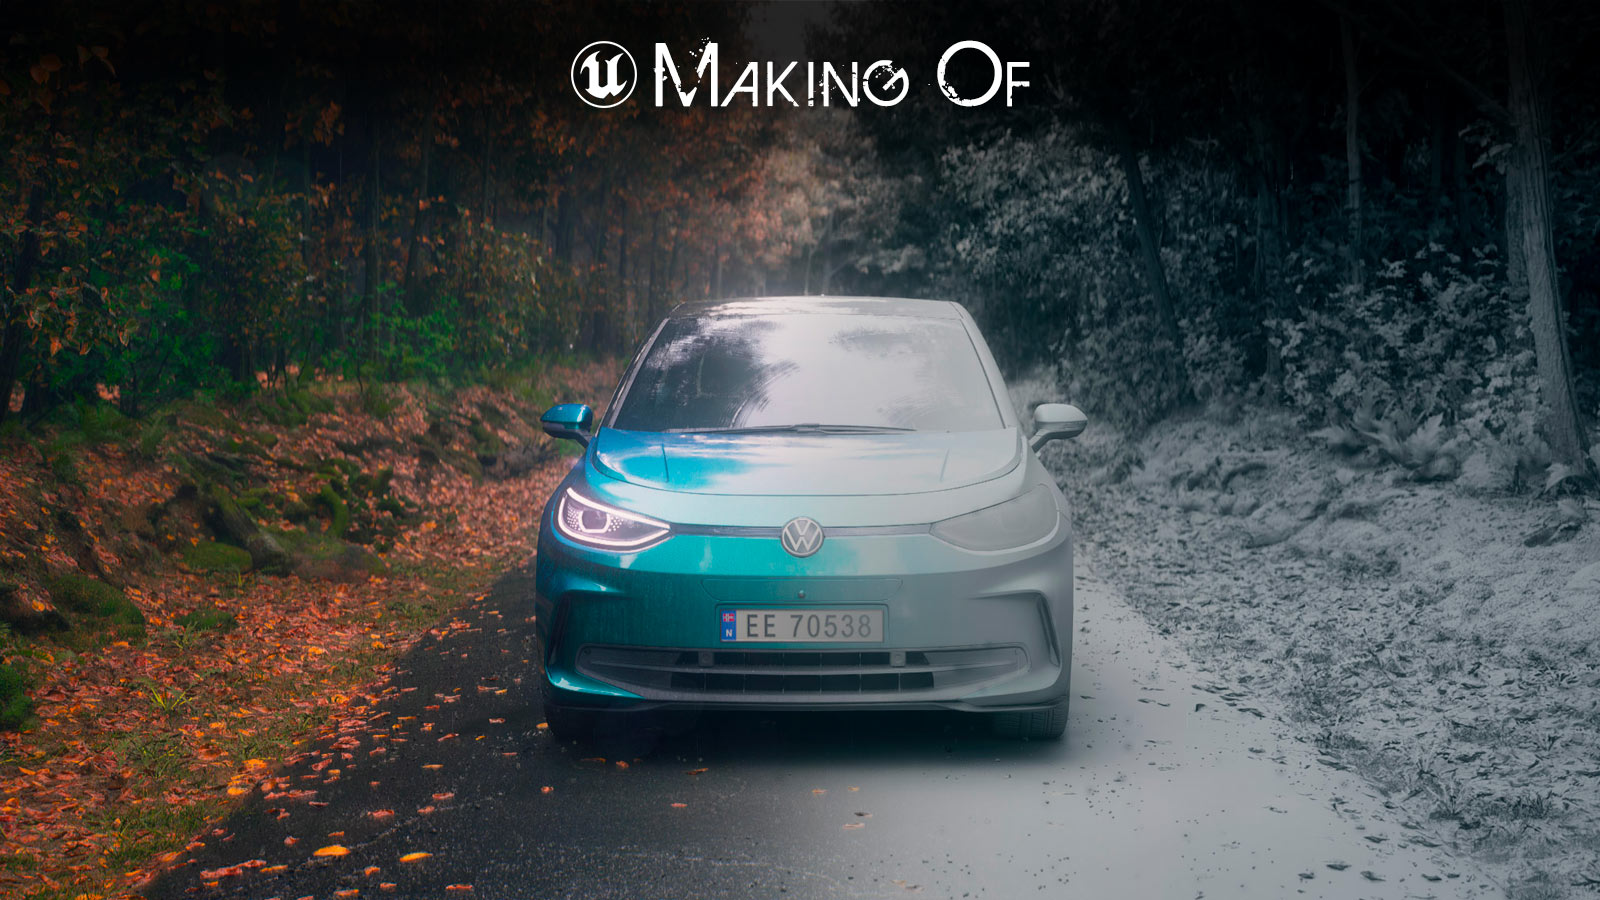
This project began in 2023 as a small assignment from Bacon Oslo for Volkswagen Norway, commemorating 75 years of safety on their cars. They needed the ID3, ID4, ID5, and IDbuzz models (purchased from 3D Squir) to be digitally added to real footage shot on a Norwegian countryside road. On the day of the shooting, the weather was terrible, so we ended up creating the full environment too and rendering the whole shot in Unreal Engine. Recently, in an attempt to tidy up my old projects, I decided to improve the cars and create an environment that matched the weather of that shooting day. I took advantage of the latest Unreal features, such as Nanite for foliage, PCG for generating the forest layout, Substrate for the cars’ shader with the water droplets, as well as the improvements in ray-traced reflections, Lumen, and Ultra Dynamic Sky. Last but not least, I had a go with the Virtual Camera Actor and used my phone to walk around the cars. Took way longer than expected to put everything together. This is a quick Making Of to show how the environment has been created, how the Substrate shaders for the Car Paint and the Glass were put together, how I made the Niagara Effect for the falling leaves, and how I set up the Virtual Camera Actor.
REFERENCES
I used PureRef to make my reference board. I found the photoshoot of the Volkswagen ID3 in the woods while I was searching for detailed references of the car model online. Those photos became my main reference. The others were used as reference for the lookdev of the cars.
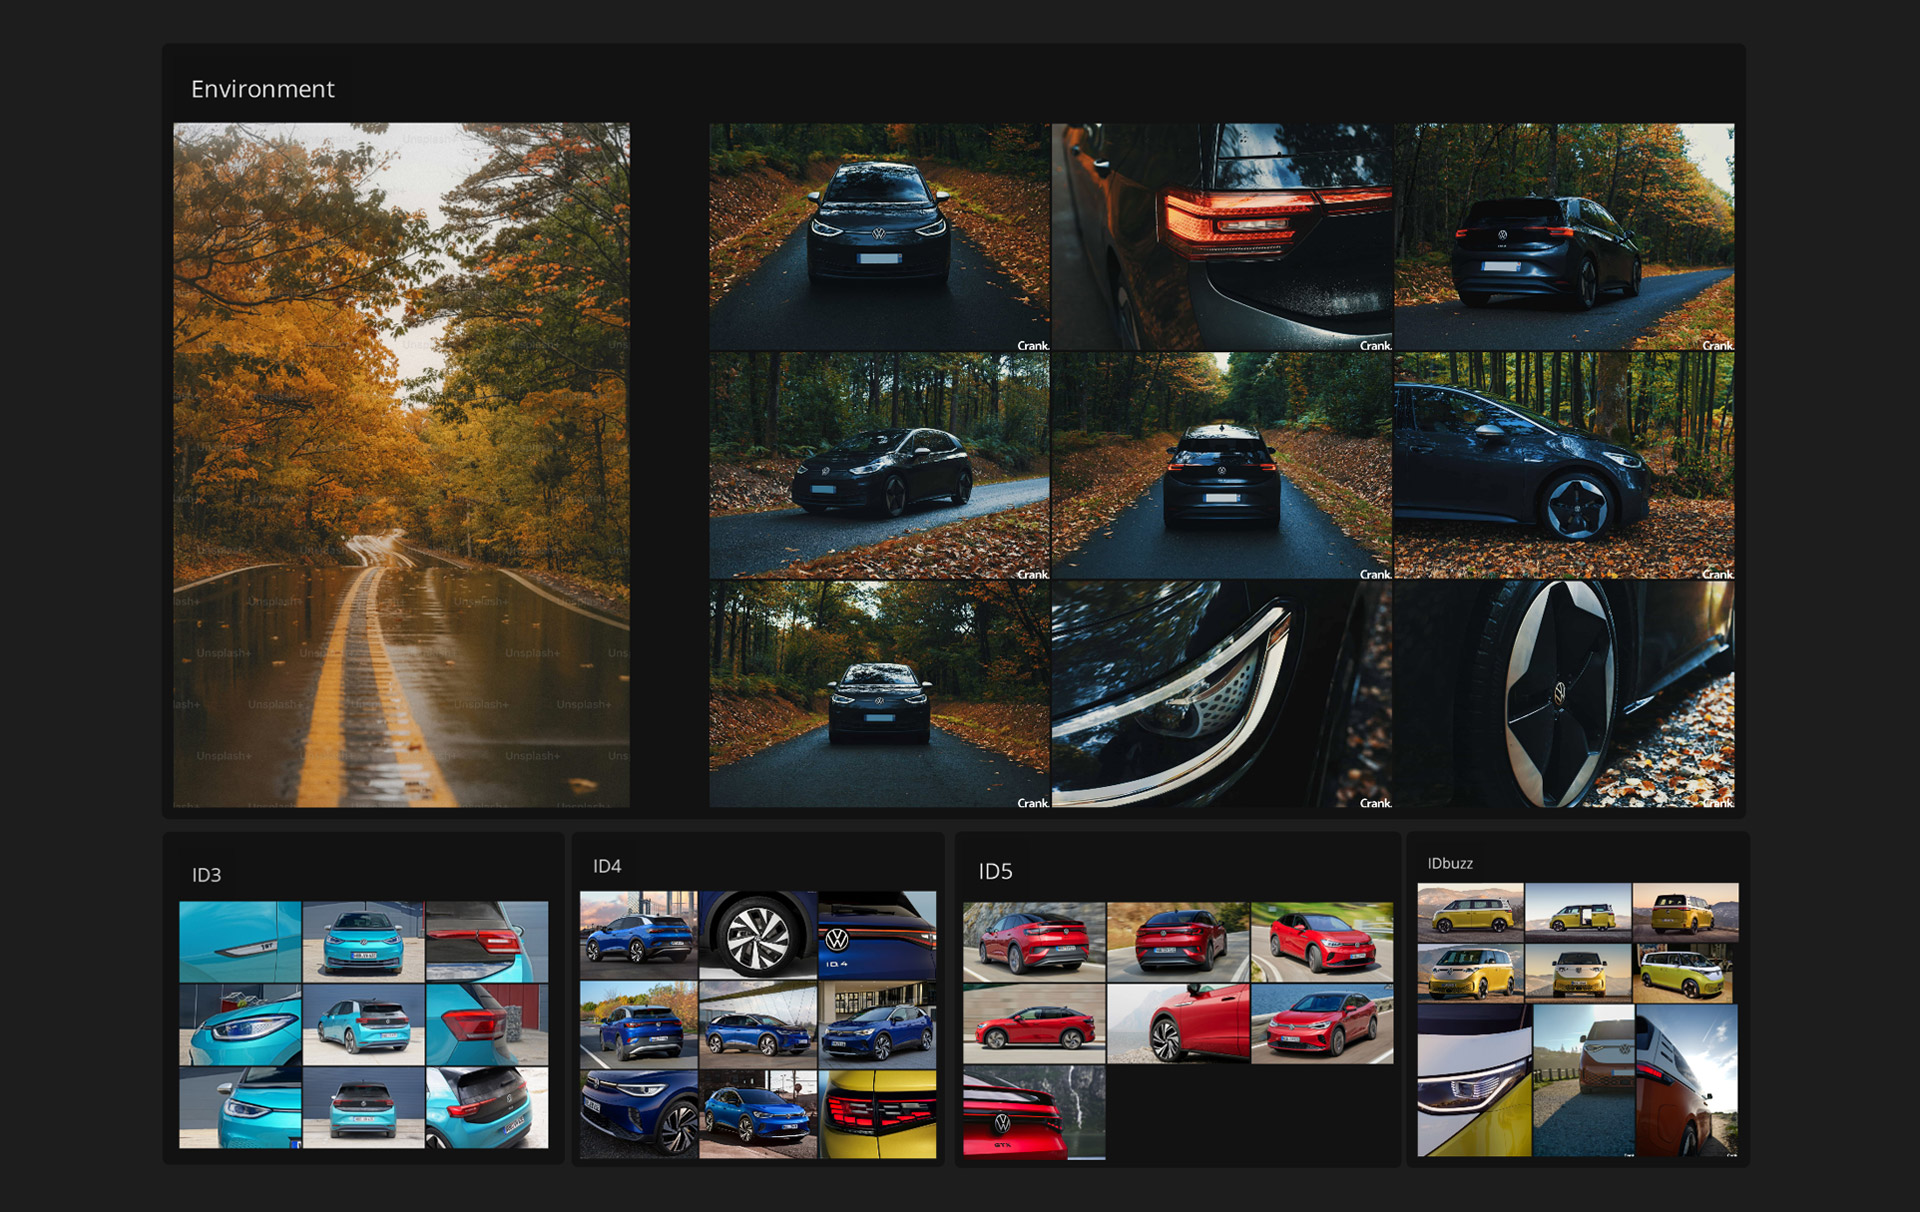
Moodboard | Shots References | Cars References
LEVEL CREATION
This is a basic list of the steps I took when I built the level. I started with a basic landscape and a tileable terrain texture, which I knew I was going to cover almost entirely. I used the spline tool to create the road, and I used a tileable geo module and texture that I tweaked later in the Detailing phase. Then I covered the landscape with high-resolution terrain patches and details. I blended the road with a terrain patch too, which I scaled and rotated to break the repetition. All the trees, shrubs, grass, and leaves are foliage (of course!). For the first line of trees on the sides of the road, I used the Pivot Painter variant of the European Hornbeam, available on Fab. The Pivot Painter gives the best response to the wind effect by offsetting the tips of the branches and the leaves more than the roots, but it’s quite expensive when you have a lot of trees. Since the Pivot Painted trees are using the same materials and textures as the static ones, I used the static trees to populate the rest of the forest. I also created two variants of the leaves shaders to have more variation from tree to tree.
I tried using dead leaves patches, but I couldn’t conform the leaves to the ground the way I wanted, so I went “brute force” and scattered more than 100.000 instances of single dead leaves. I used the same single dead leaves for the Niagara FX of the falling leaves. The tarmac detailing is done mostly by vertex painting between 2 tarmac variants and some small pebbles scattered along the edges.
Adding the wetness and the rain took a bit of time to work well. For the raindrops, the splashes, and the tarmac, I used the weather features of Ultra Dynamic Sky. It got a bit tricky with the car tires, the paint, and the glass. I ended up using custom shaders I made myself. That way, I had full control of all the aspects I needed, even though I regretted not trying to animate the droplets on the cars!
The Post Process Volume was used to steer away from the cold tones and add a bit of warmth, similar to the main reference. I also added a bit of haze and bloom, just standard stuff and basic settings.
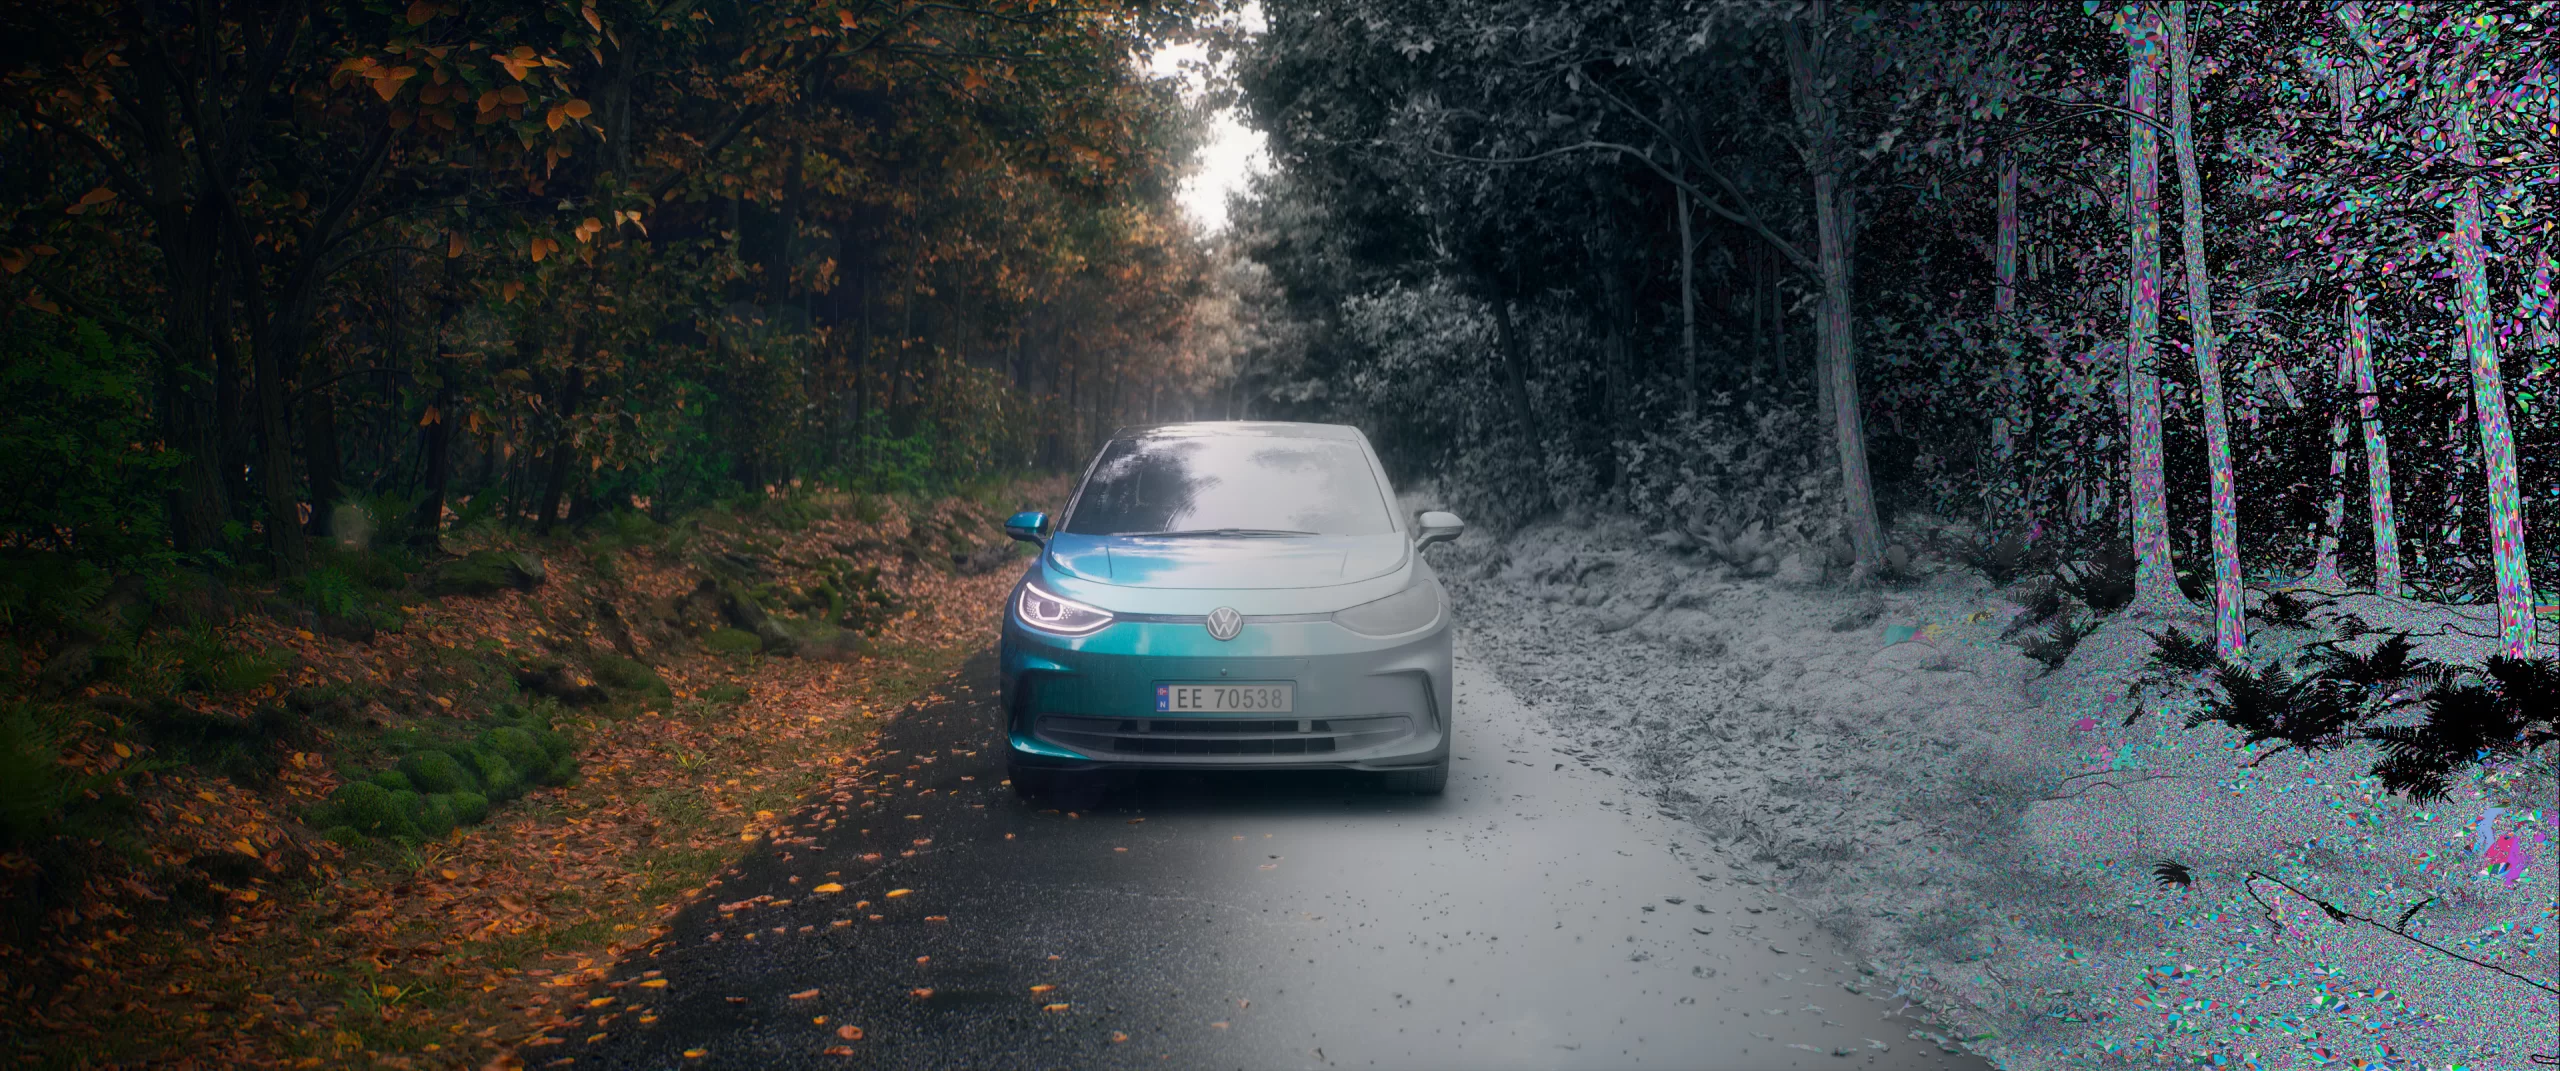
Final Image | Detail Lighting | Nanite Triangles
Landscape / Terrain / Animated Trees + Static Trees / Leaves / Shrubs and Grass / Tarmac Details / Weather + Droplets / Post Process volume
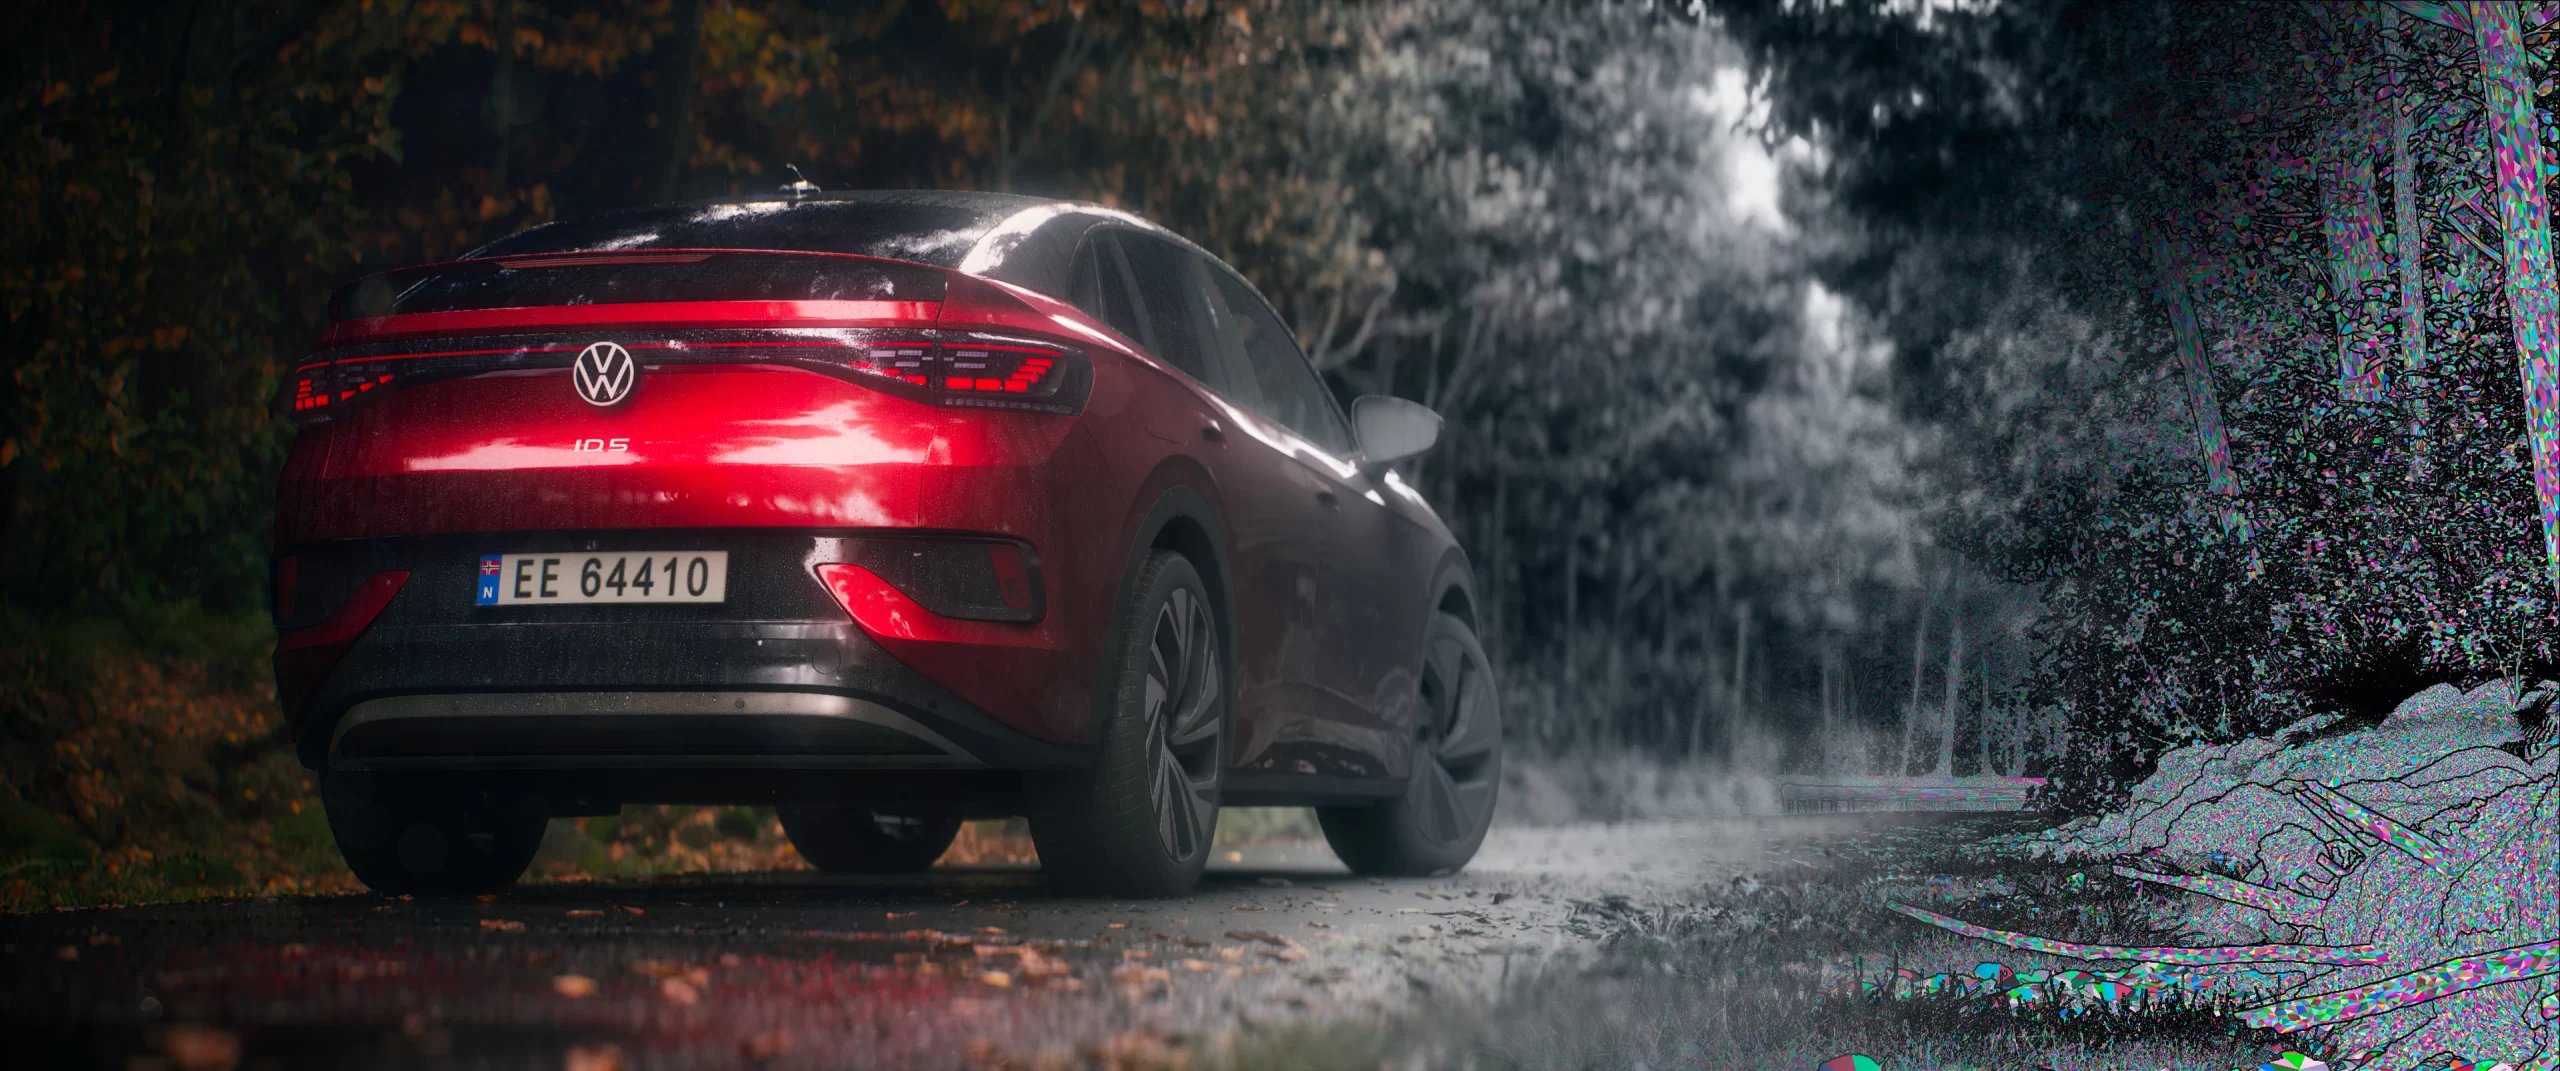
Final Image | Detail Lighting | Nanite Triangles
Landscape / Terrain / Animated Trees + Static Trees / Leaves / Shrubs and Grass / Tarmac Details / Weather + Droplets / Post Process volume
SHADERS
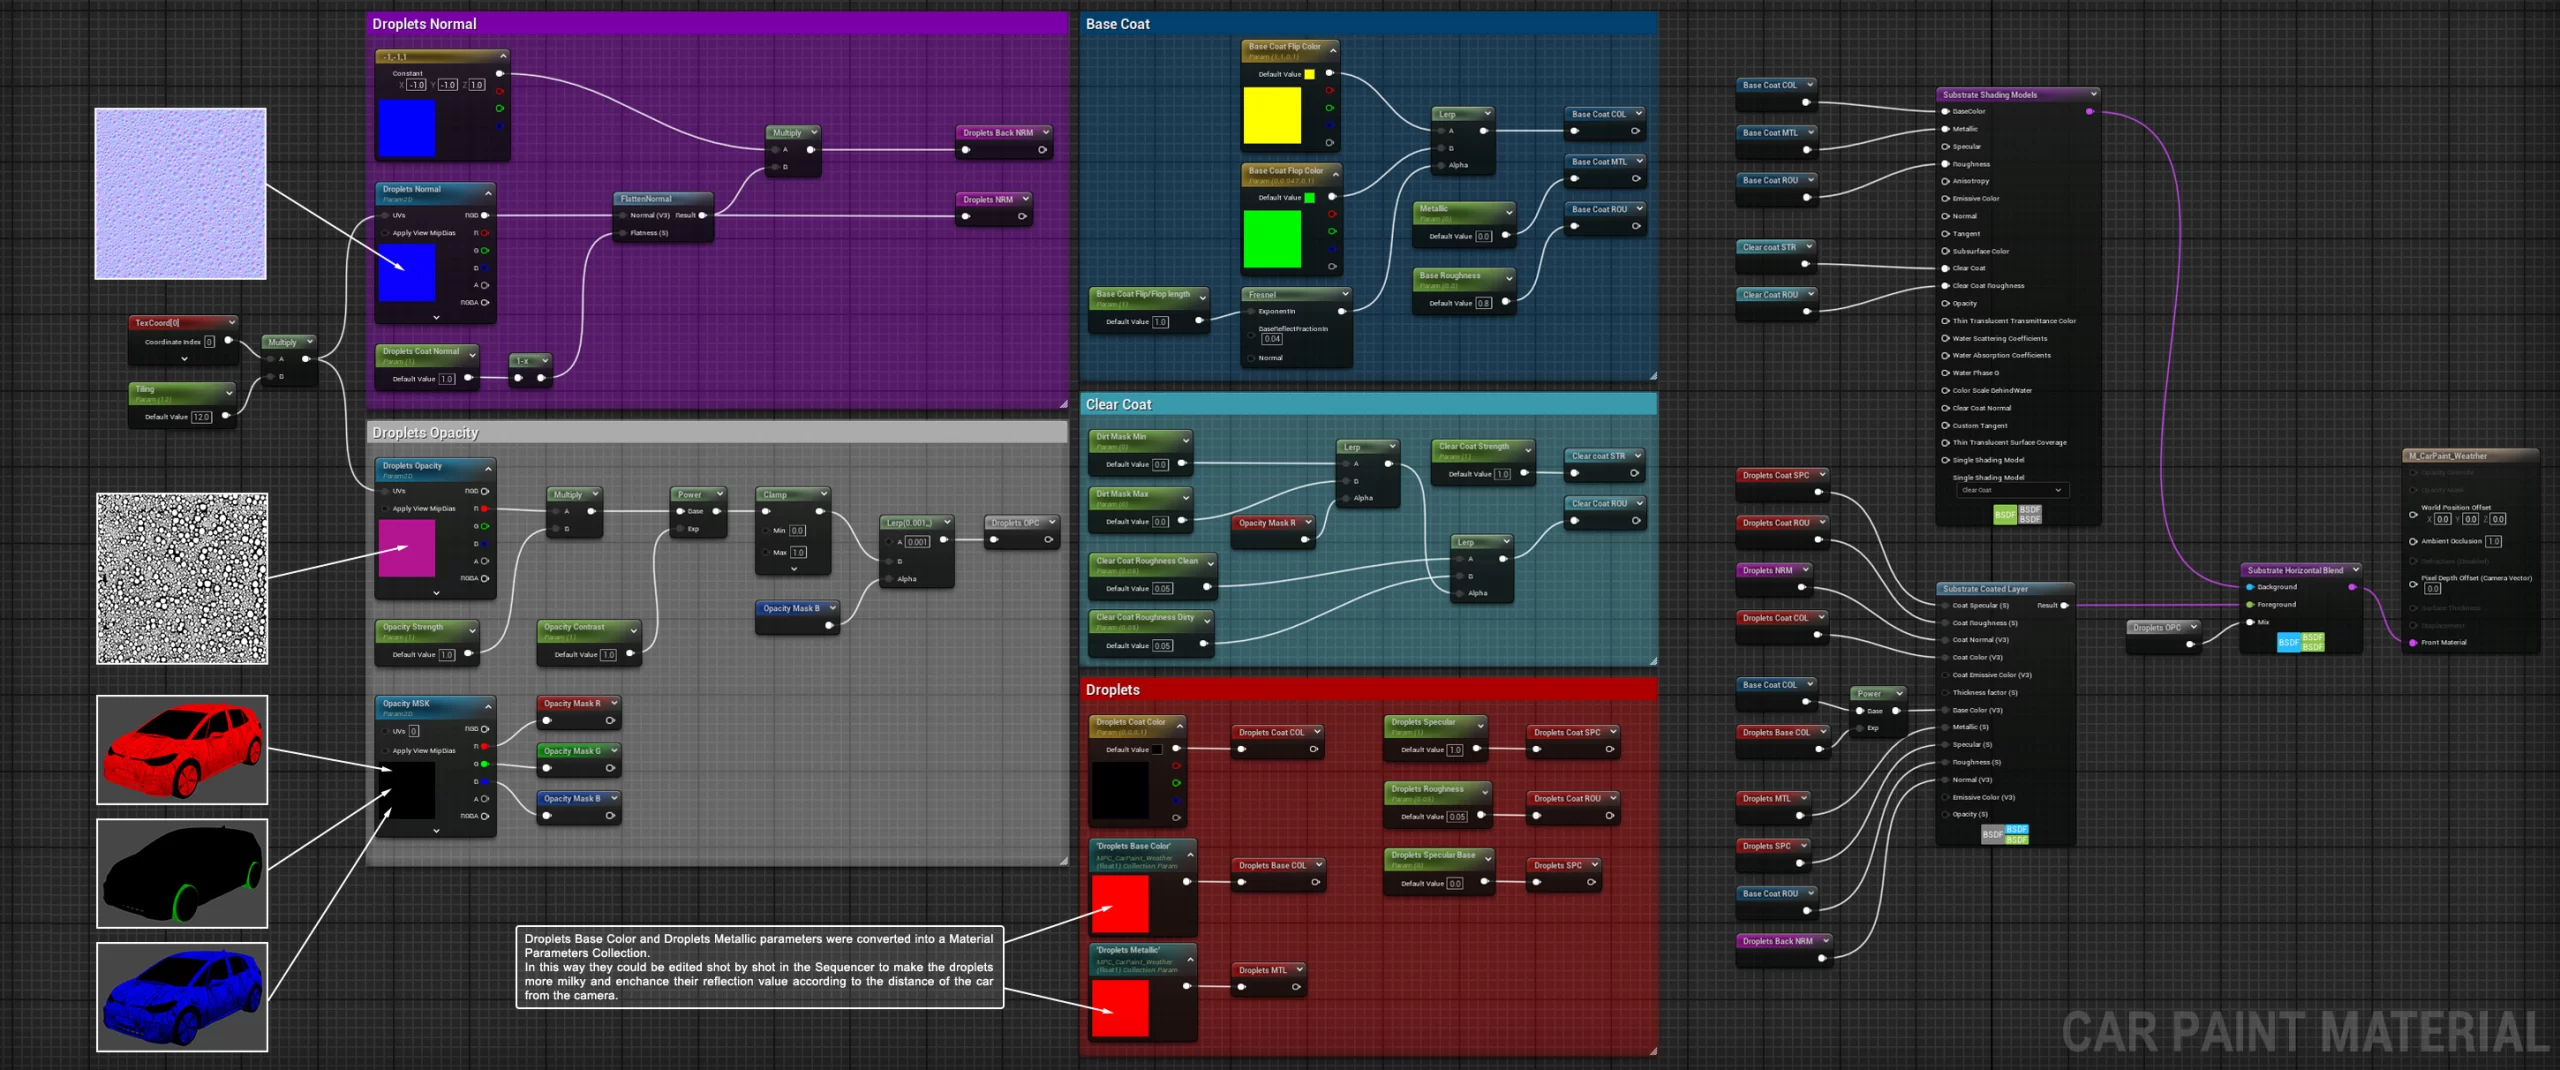
To create the water droplets, I started with How To Make a Water Droplet Material Video by William Faucher. Although it’s for Unreal Engine 4.27, the information is still relevant. However, I encountered a problem early in the shader development process: my car paint shader already requires both a base layer and a coat layer, which means I couldn’t use those layers for the droplets. Fortunately, I discovered a fantastic solution in Substrate. Substrate converted all the existing shaders in the level to compatible versions, and I didn’t encounter any issues with any of them. I then proceeded to build a custom material with a base shader that included a Clear Coat Layer for the car paint. Then I created a Substrate Coated Layer for the droplets, which was basically another shader with a Clear Coat Layer. And then I mixed the two shaders with a Mask that I created in Substance Painter. I used a Horizontal Blend for Substrate because the two materials (car paint and droplets) are fundamentally different, so I could edit the parameters of both independently.
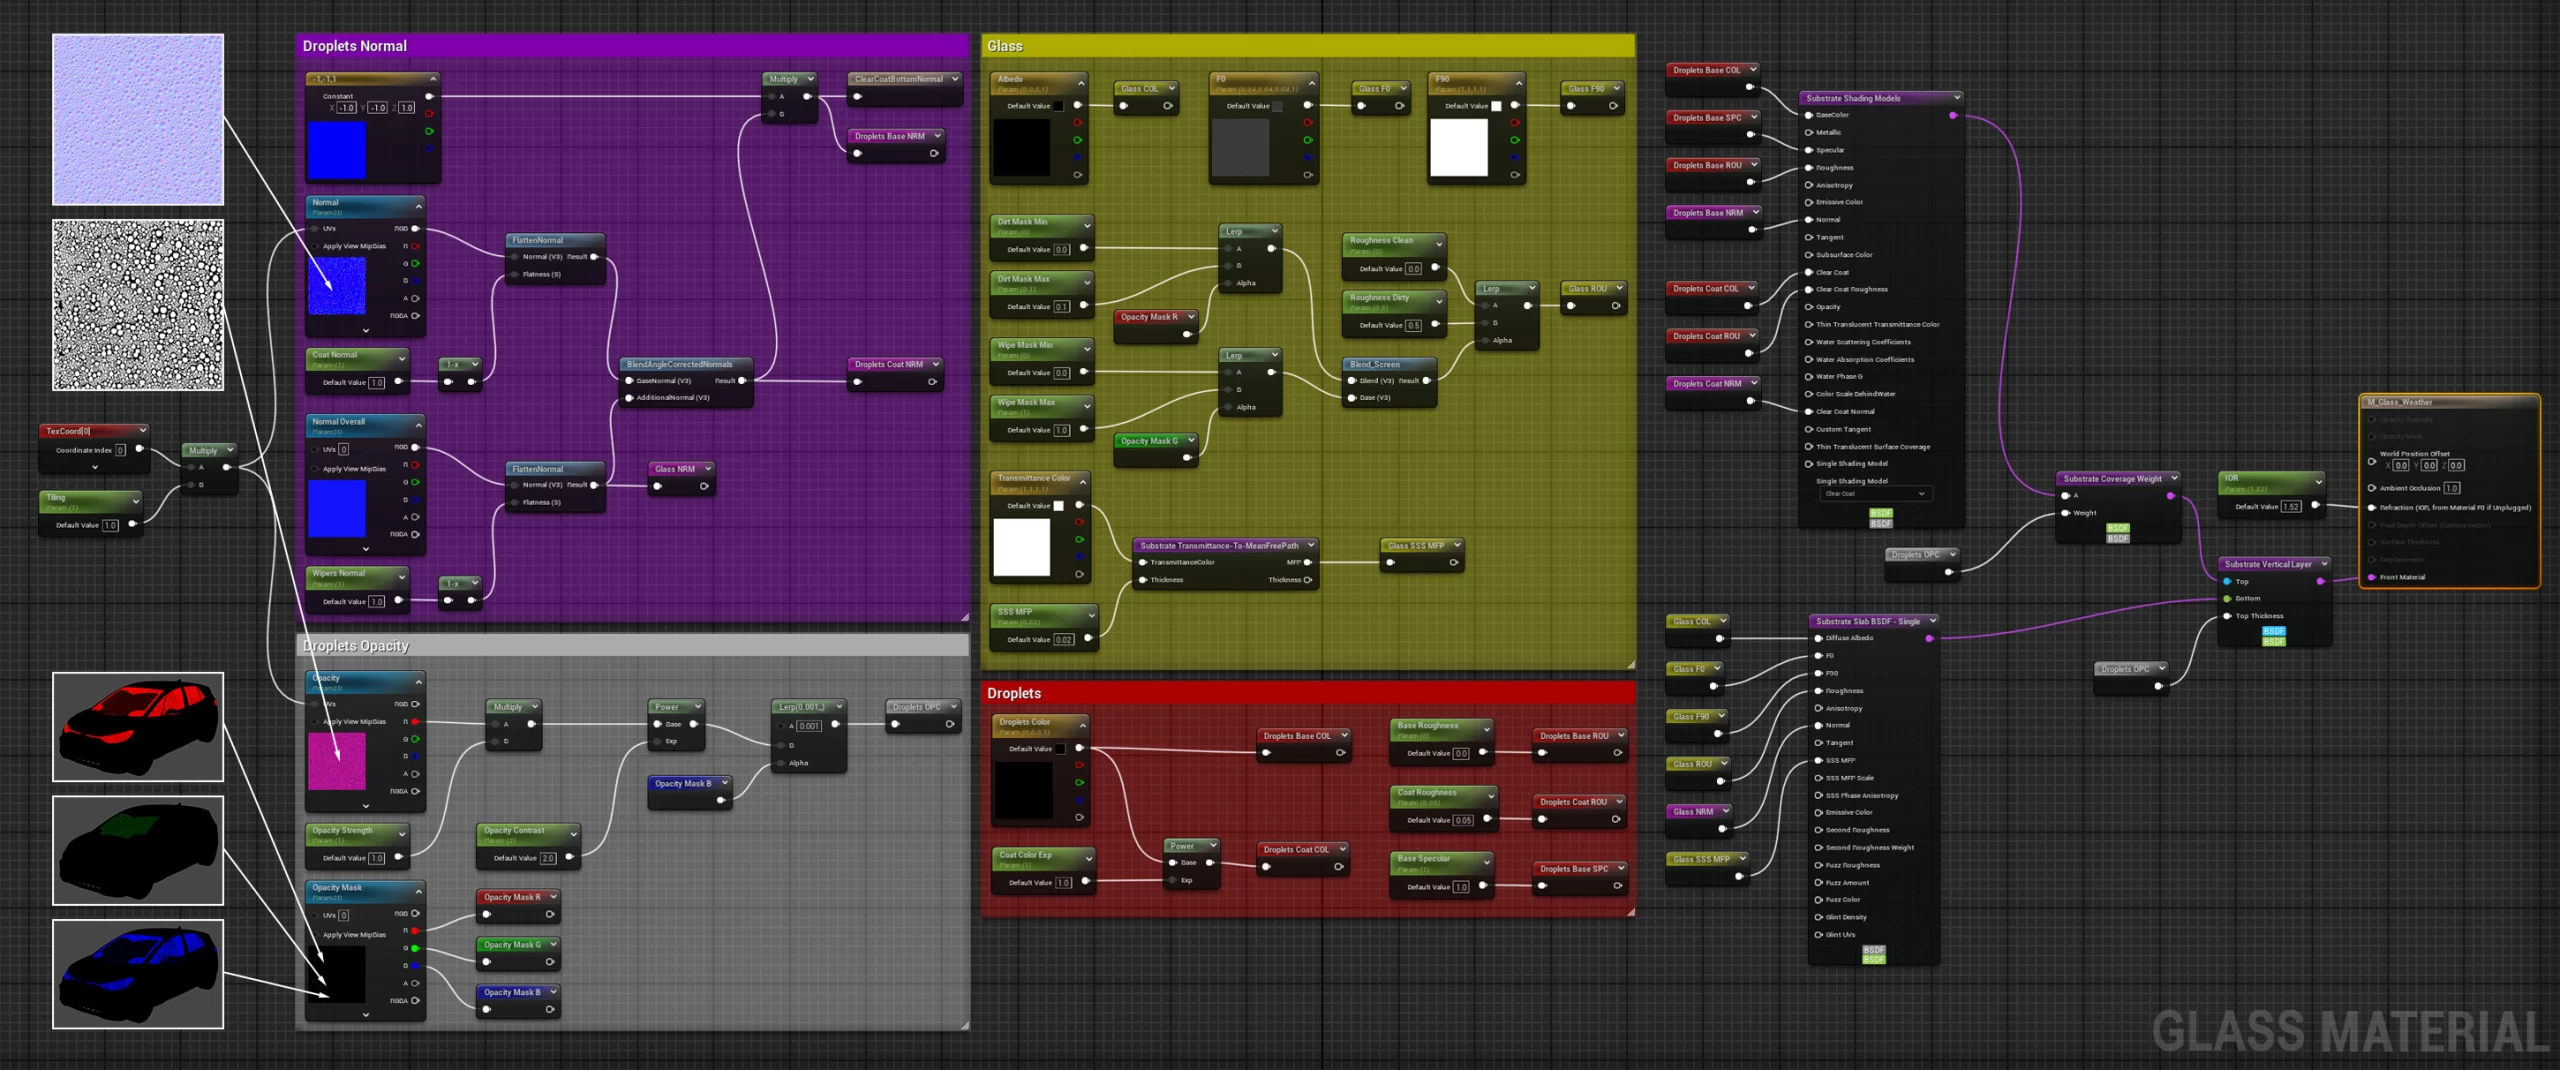
The situation was different with the glass material, where I didn’t need a Clear Coat, but I needed the material to be translucent, and on top, I needed an equivalent setup for the Droplets. That’s why the material setup is different, especially for the blending, which is a Vertical Blend in this case, with Weight and Thickness still based on the opacity mask I painted in Substance Painter.
If you wonder what happened to all the connections in the node graph, I’m taking extensive advantage of the Reroute Nodes to keep the graph organized. William Faucher made a fabulous short video about this topic.
Car Paint Material
Glass Material
NIAGARA FX
The rain effect was created using the Weather Effects feature of Ultra Dynamic Sky. It worked perfectly from the beginning, so I only needed to adjust the size of the rain and splashes to simulate a light drizzling effect instead of heavy rain. This adjustment made it more compatible with the car droplets.
The work on the falling leaves emitter, however, involved some trial and error. I started with Easy Falling leaves! a video tutorial by Aziel Arts, which I found to have two significant advantages over other videos I found on the same topic. First, he uses a template to begin with, providing a head start, as many features are already set up properly. Second, after testing the emitter with sprites, he assigns leaf meshes to create a real-case scenario. He also covers important details such as Aerodynamic Drag, Friction, Rest State, and Particle Alignment. In the end, I created my own particle emitter by tweaking several parameters based on his tutorial. I placed eight emitters around the car and along the road. For each shot, I baked the simulation. This process was fairly quick and significantly helped with the motion blur during rendering, as the movement of the leaves was predetermined, which paired well with the Temporal Anti-Aliasing.
Final Disclaimer: I’m not an FX artist, so my setup is probably a bit clumsy, but in the end, it gets the job done!
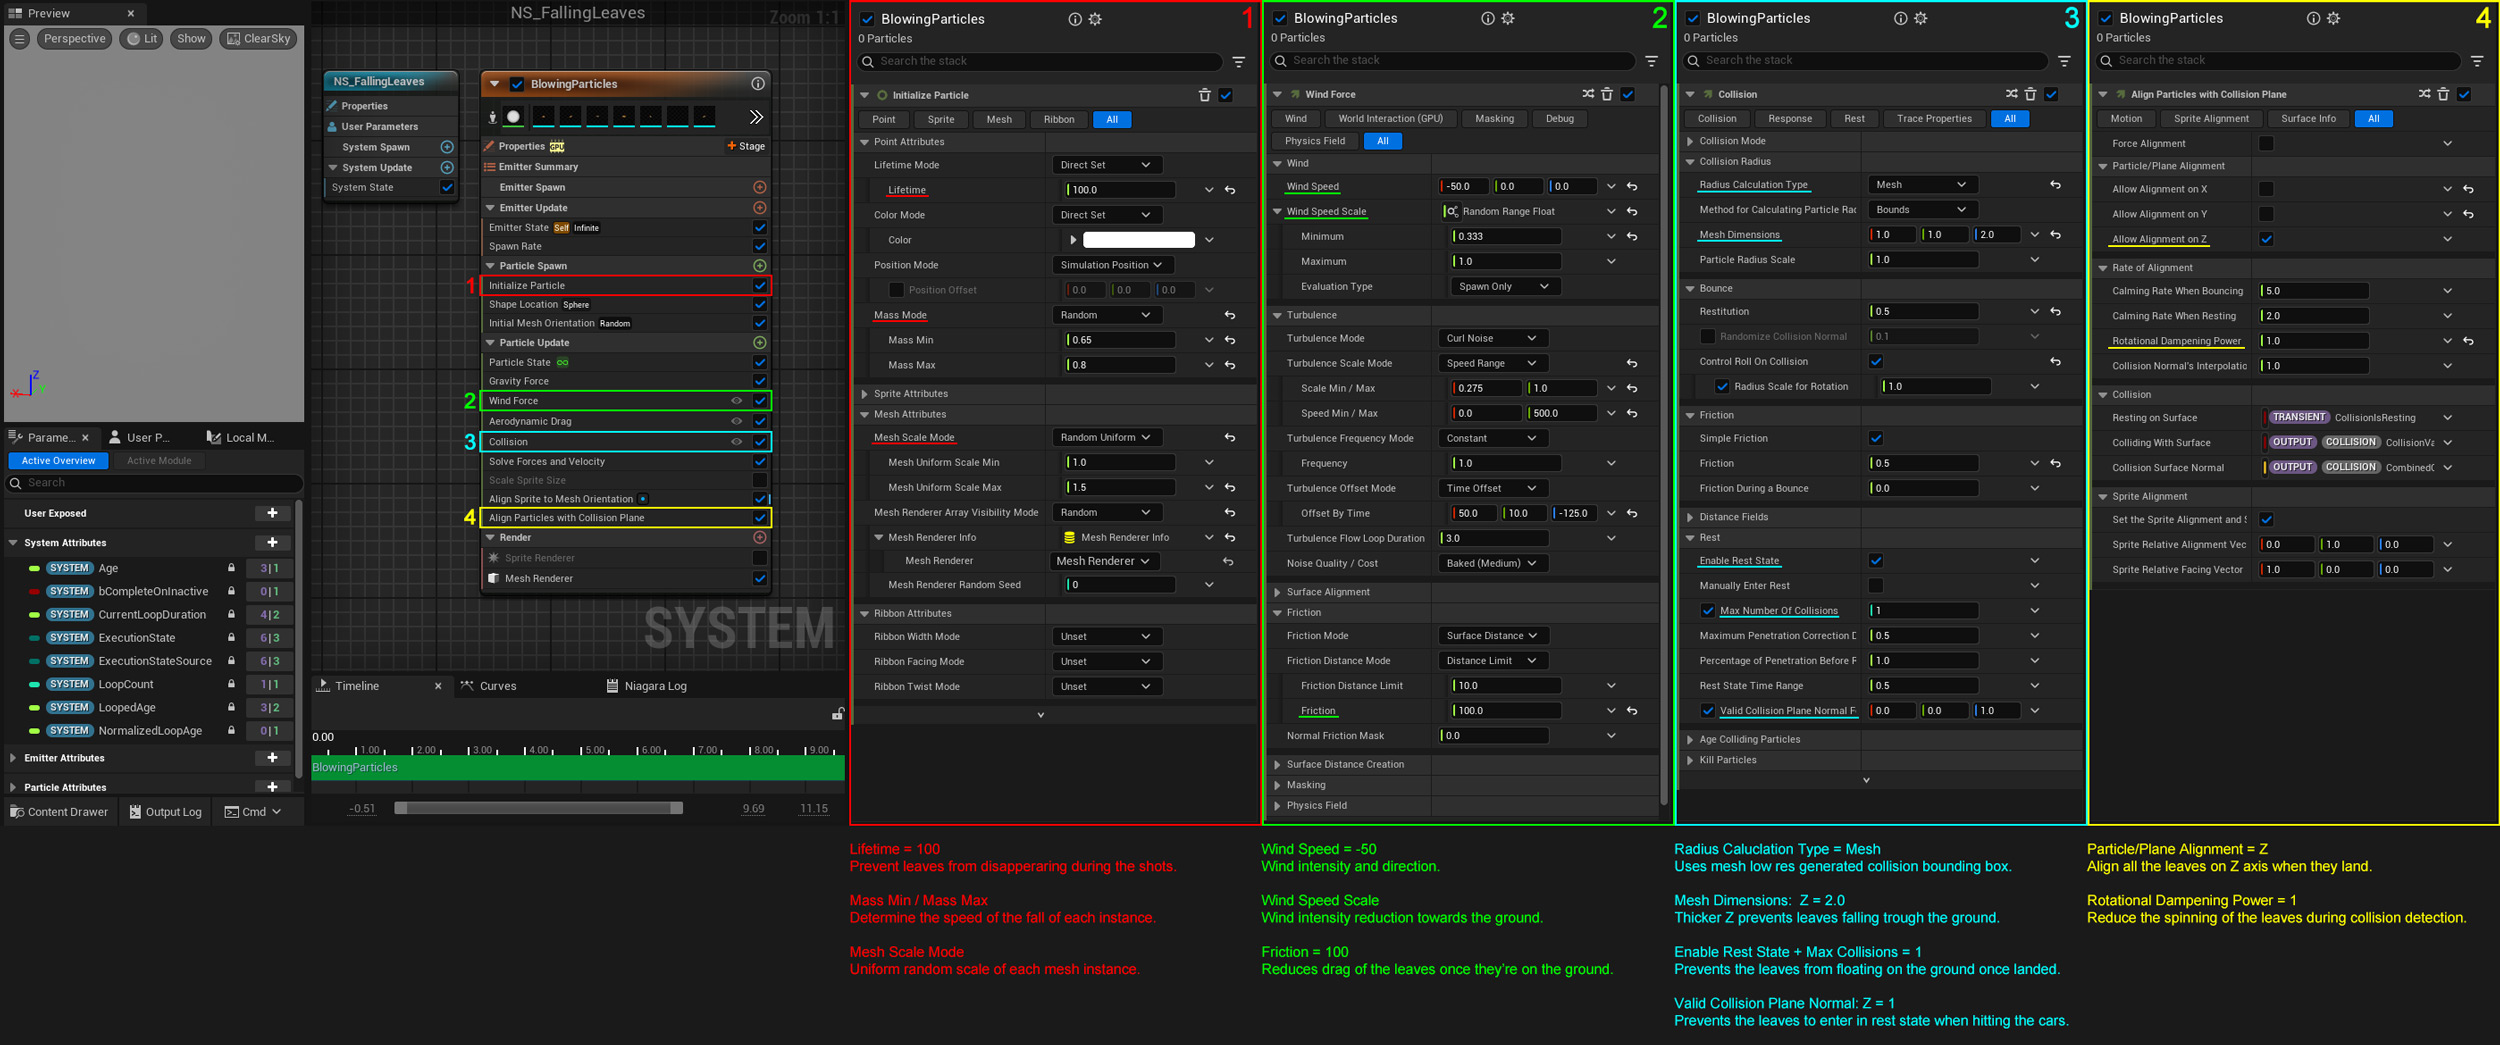
Falling Leaves Niagara System
SHOOTING AND RENDERING
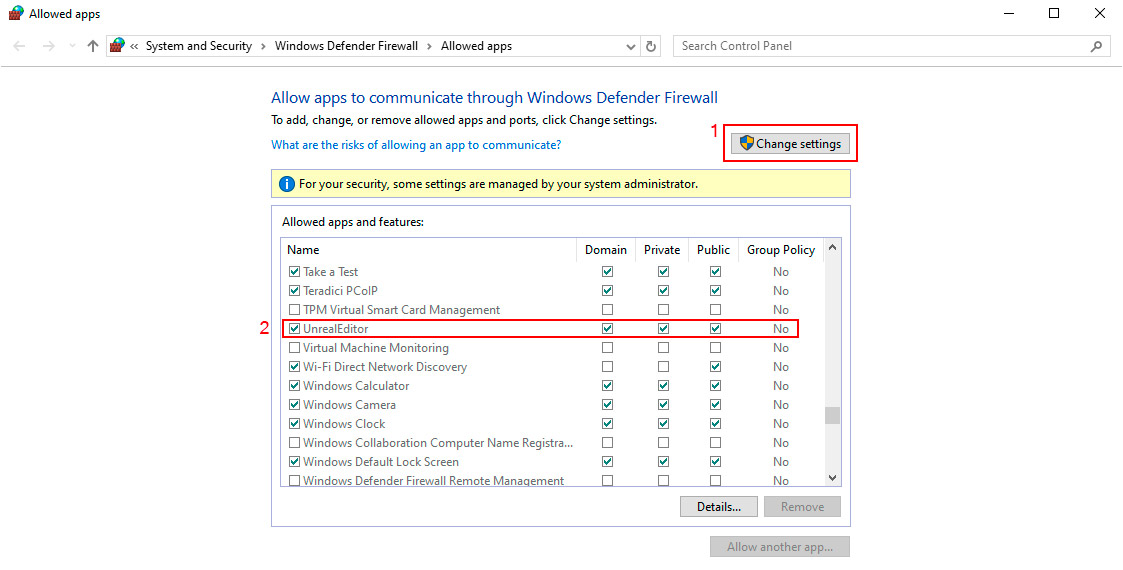
One of the main reasons to upgrade the project to Unreal 5.5, together with PCG and Substrate, was the ability to use the new built-in Virtual Camera plugin. It really works great, and it just requires enabling a couple of plugins and downloading the Unreal VCam App on your handheld device, either iOS or Android. You can refer to any of the many tutorials available on YouTube or check the documentation on the Epic website. One thing that I want to mention before I start is that you need to be sure that Windows Firewall has a rule set for Unreal Editor. Even if you did set it up in the past, an update to Windows or to the Epic Launcher or Unreal Editor can wipe that rule off. It was my case. In the early tests, everything worked perfectly, then a couple of weeks later, when I picked up this project again, the connection failed to be established. Before you start fiddling with IP numbers, settings and so on in Unreal Engine as I did, do yourself a favour and make sure Unreal Editor is in the list of your apps in Windows Firewall; otherwise, you can add it and enable the access.
Using the Virtual Camera actor is working pretty much like a normal Camera. You create a new one for each shot, and every time you record a new take, it’ll be saved as a subsequence with a spawnable camera. Then you can add the spawnable camera to your main sequence, select the take you like, and work in the sequencer as usual. Each take of each camera has its own settings, so you can commit to the settings such as camera lens, aperture, focus distance and so on right at the end. The only relevant thing as you shoot is the track of the camera movements. A couple of things I found handy when recording the takes:
− In the Engine Scalability Settings, reduce what you can to the minimum, to make sure your framerate is high and constant. Frame drops will result in jagged camera movements or loss of tracking. You can always fix that later by editing the curves in the Curve Editor of the camera track if it’s a minor issue, but it’s definitely not ideal!
− Once you enable the Virtual Camera Actor, you’re locked to it, so going around your level using the joysticks or walking around is not the best. Save Bookmarks of the initial shot angles, so you can place yourself in the best spot to start recording first, and recall the bookmark of the shot. That way, you’ll also maintain consistency between takes.
− In the camera settings, if you navigate to the movement settings, you can edit the Movement Multiplier. In case you don’t have a huge empty room to use, increasing the planar movement is a good idea. I did several takes, trying to walk past the car, and I could never reach it. Multiplying by x3 did the trick.
− This setting is a bit hidden, and I don’t know why it is not present in the scroll wheels together with the rest. In the camera modifier stack, under the Index [7], there is a Stabilisation Modifier. Reducing the weight to numbers close to zero and increasing the smoothness to 20 or even more will help to generate a smoother movement.
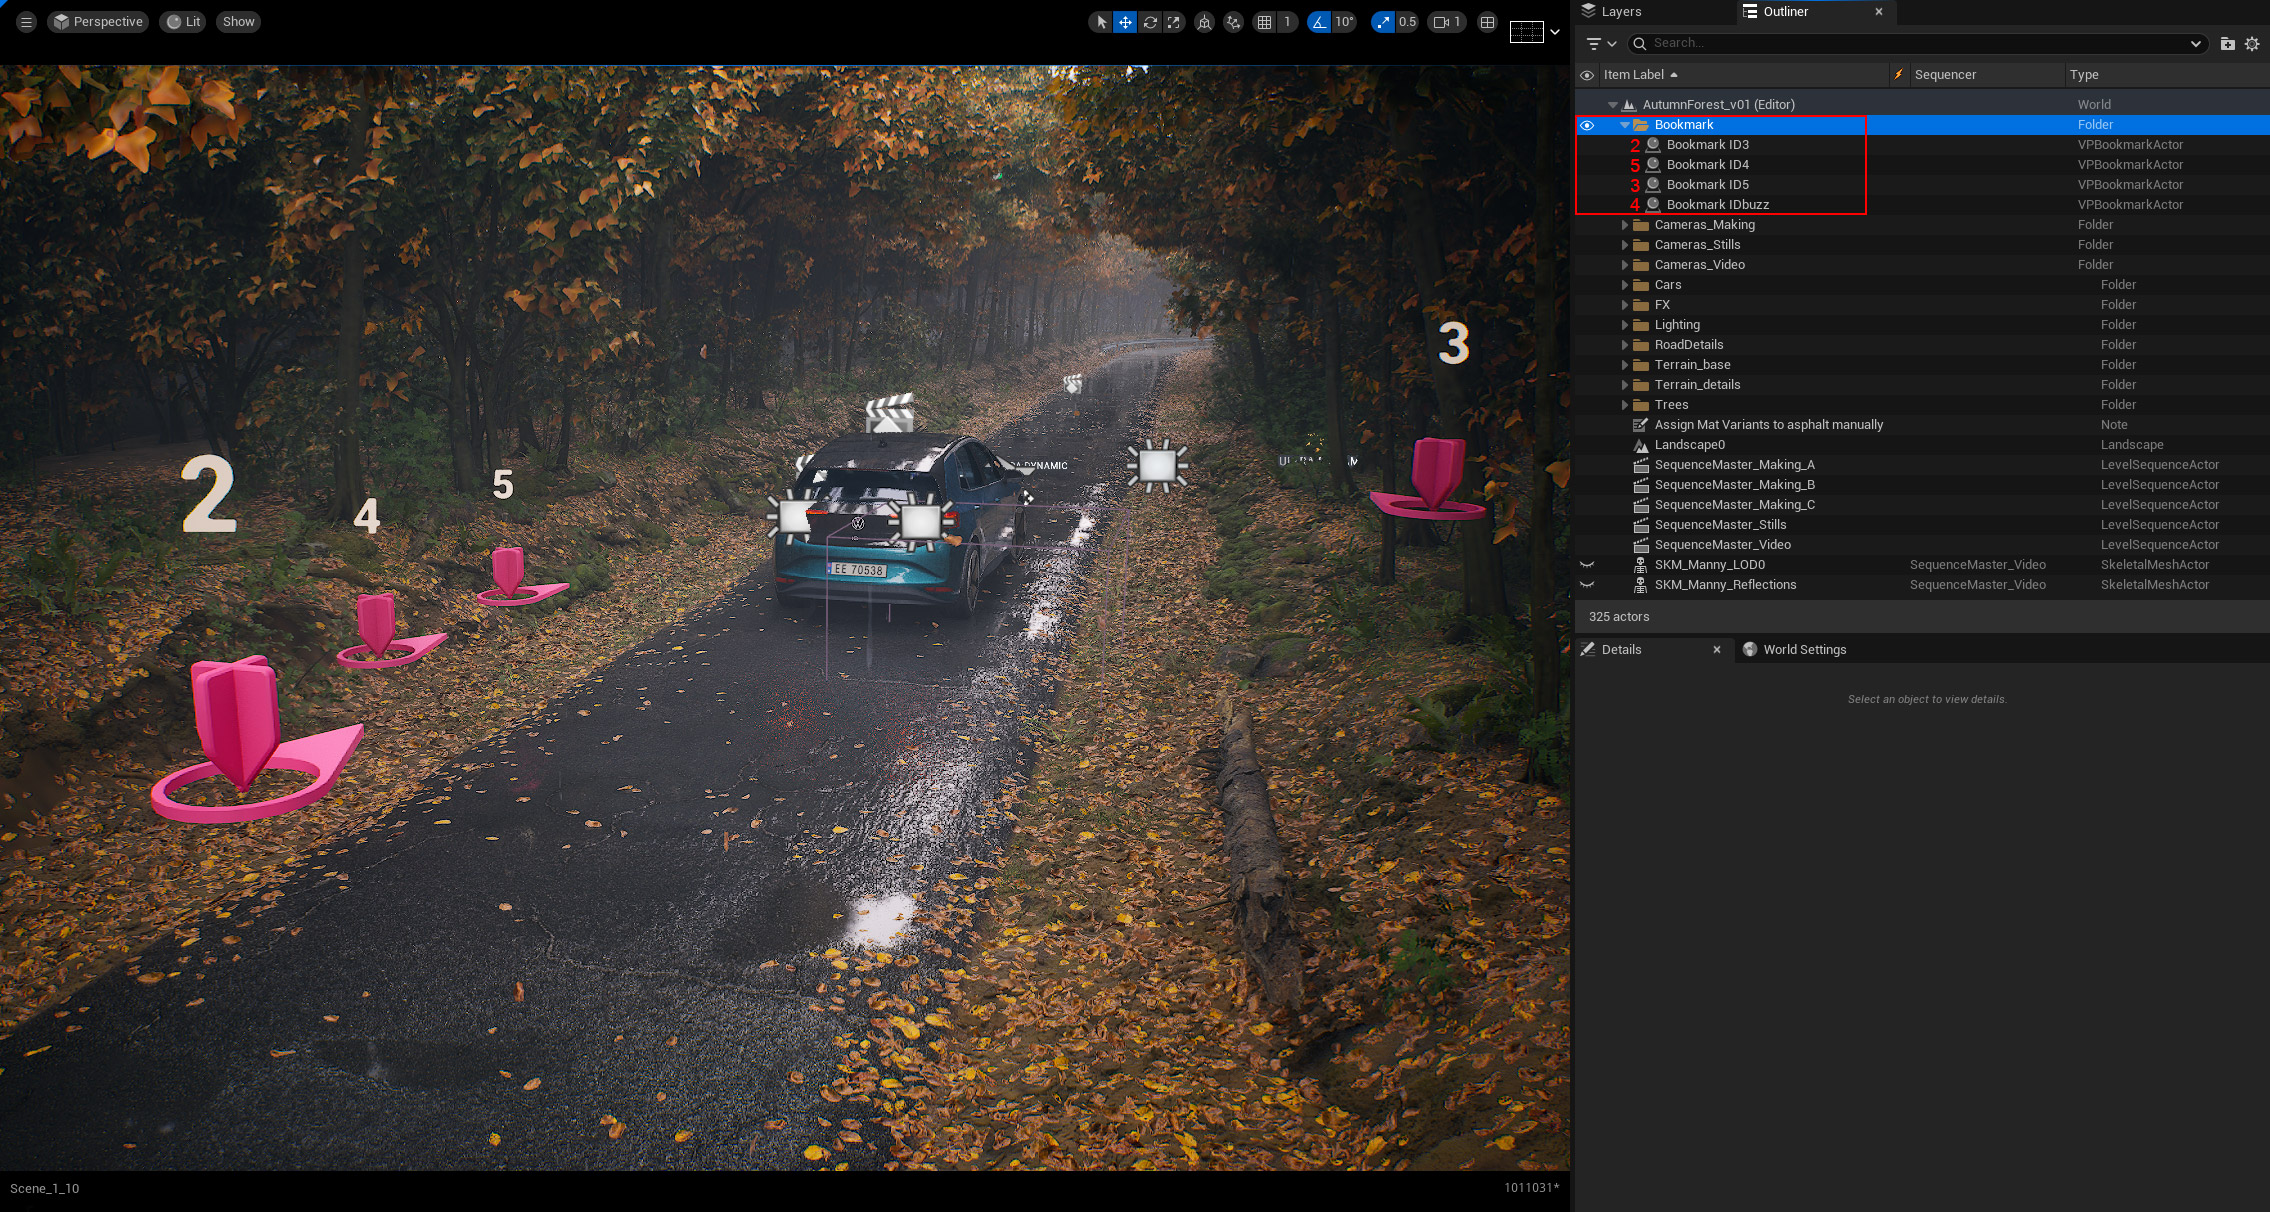
Adding Bookmarks allows you to have the Virtual Camera already in place, always in the same place
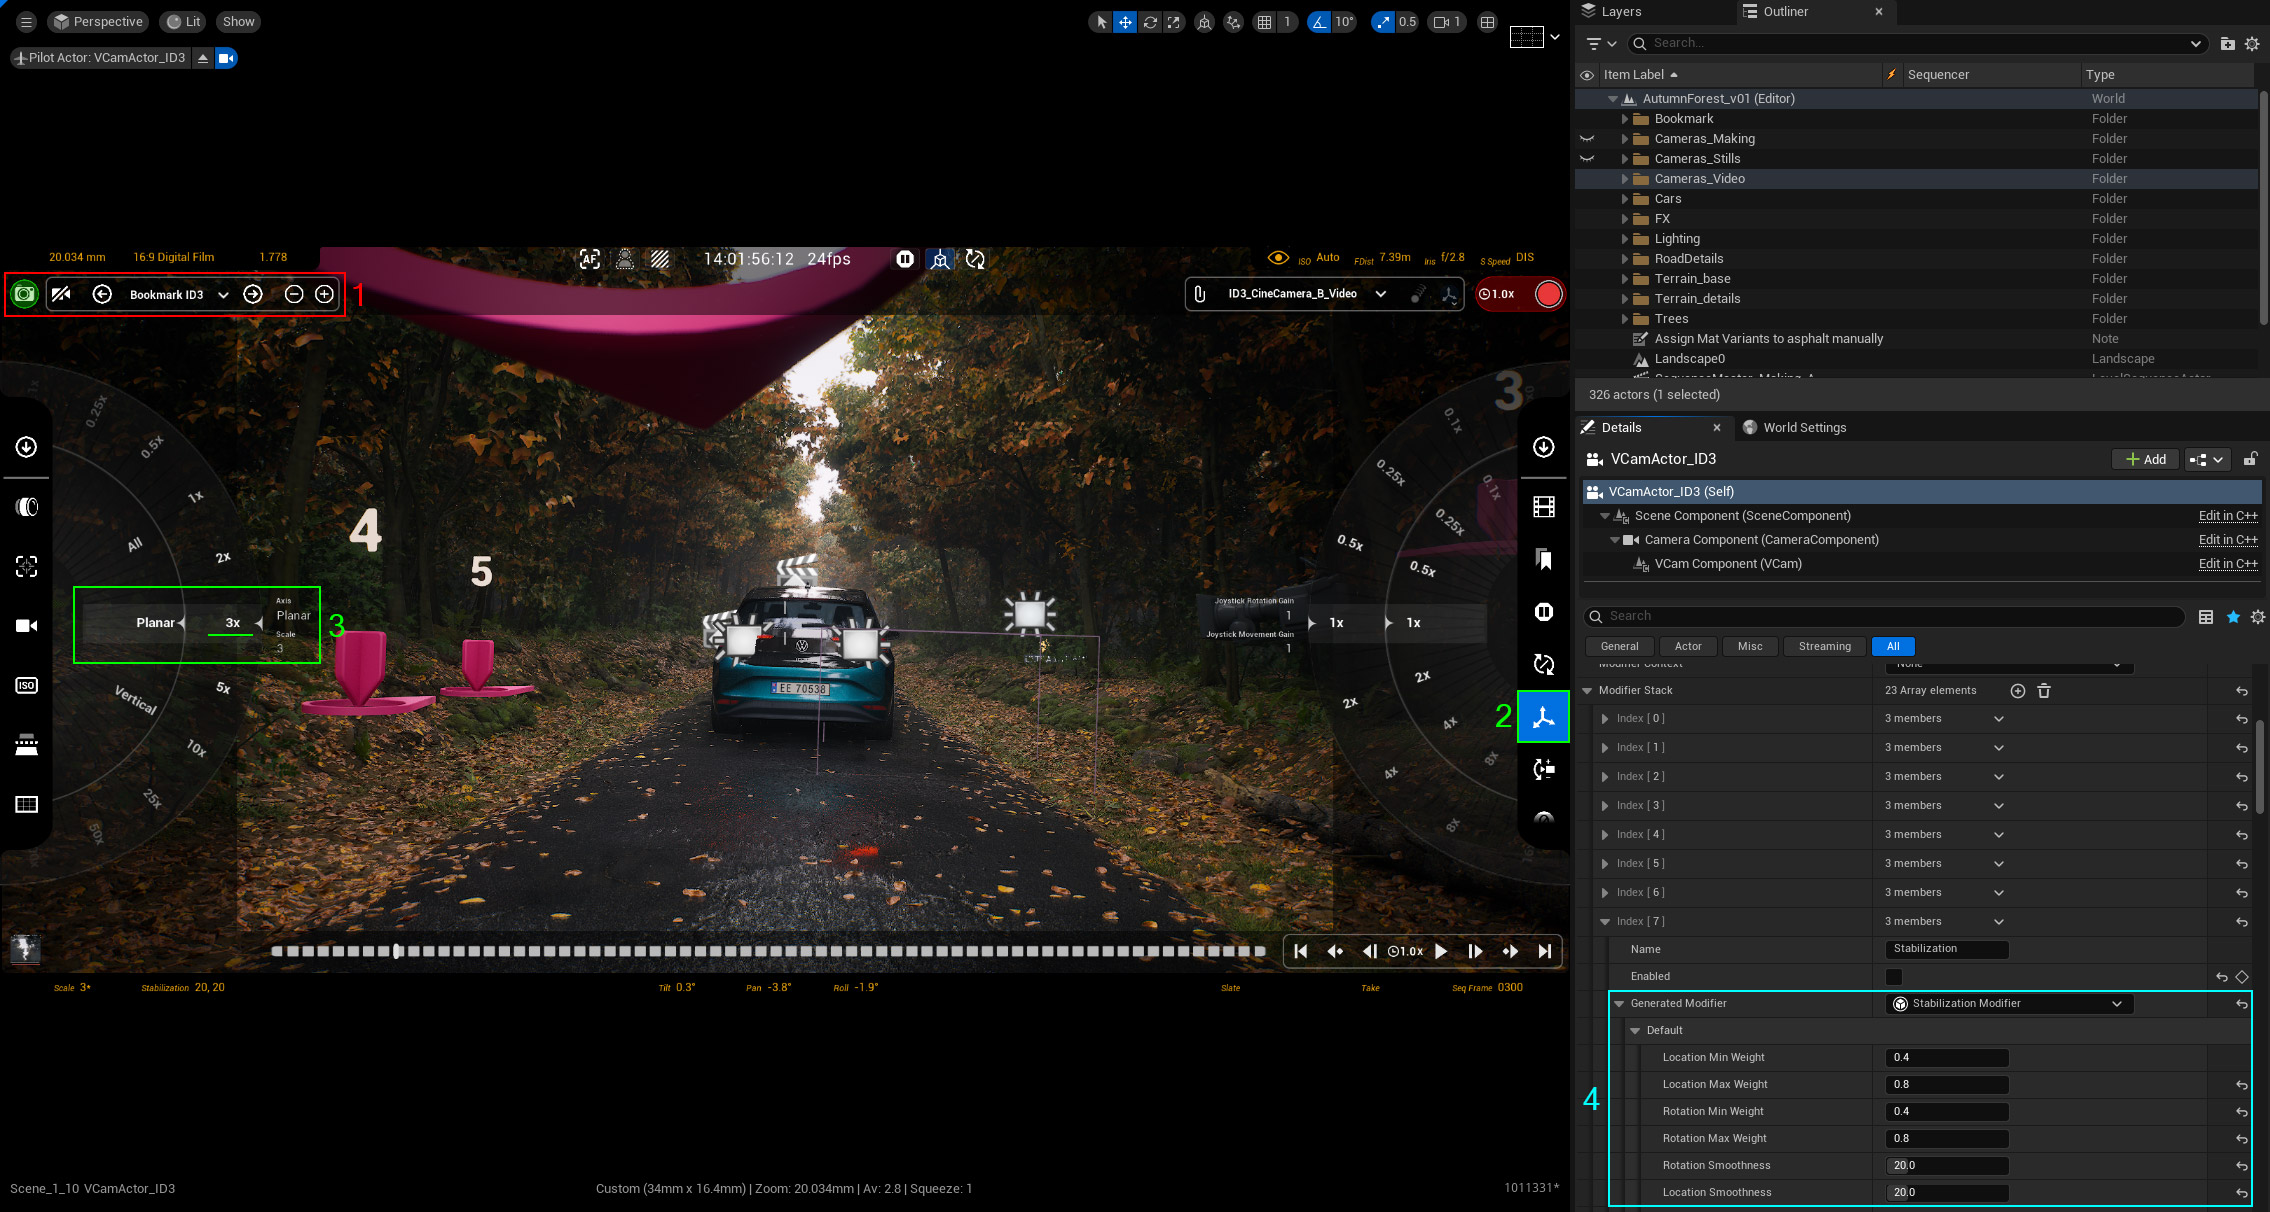
Settings for the Virtual Camera